Basic Sensors for Robot Grippers

Robot gripper with inductive proximity sensors mounted

Typically when we talk about end-of-arm tooling we are discussing how to make robot grippers smarter and more efficient. We addressed this topic in a previous blog post, 5 Tips on Making End-of-Arm Tooling Smarter. In this post, though, we are going to get back to the basics and talk about two options for robot grippers: magnetic field sensors, and inductive proximity sensors.

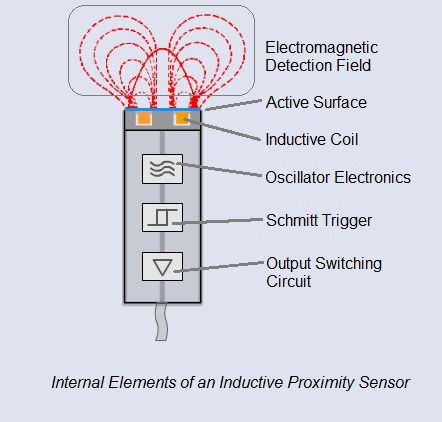
One of the basic differences is that detection method that each solution utilizes. Magnetic field sensors use an indirect method by monitoring the mechanism that moves the jaws, not the jaws themselves. Magnetic field sensors sense magnets internally mounted on the gripper mechanism to indicate the open or closed position. On the other hand, inductive proximity sensors use a direct method that monitors the jaws by detecting targets placed directly in the jaws. Proximity sensors sense tabs on moving the gripper jaw mechanism to indicate a fully open or closed position.

BMF_Grippers
Robot gripper with magnetic field sensors mounted

Additionally, each solution offers its own advantages and disadvantages. Magnetic field sensors, for example, install directly into extruded slots on the outside of the cylinder, can detect an extremely short piston stroke, and offer wear-free position detection. On the other side of the coin, the disadvantages of magnetic field sensors for this application are the necessity of a magnet to be installed in the piston which also requires that the cylinder walls not be magnetic. Inductive proximity sensors allow the cylinder to be made of any material and do not require magnets to be installed. However, proximity sensors do require more installation space, longer setup time, and have other variables to consider.

Let’s Get Small: The Drive Toward Miniaturization

minisensorGoing about our hectic daily lives, we tend to just take the modern cycle of innovation for granted. But when we stop to think about it, the changes we have seen in the products we buy are astonishing. This is especially true with regard to electronics. Not only are today’s products more feature-laden, more reliable, and more functional…they are also unbelievably small.

I remember our family’s first “cell phone” back in the ’90s. It was bolted to the floor of the car, required a rooftop antenna, and was connected to the car’s electrical system for power. All it did was place and receive phone calls. Today we are all carrying around miniature pocket computers we call “smartphones,” where the telephone functionality is – in reality – just another “app”.

Again going back two decades, we had a 32″ CRT analog television that displayed standard definition and weighed over 200 pounds; it took two strong people to move it around the house. Today it’s common to find 55″ LCD high-definition digital televisions that weigh only 50 pounds and can be moved around by one person with relative ease.

LabPhotoThese are just a couple of examples from the consumer world. Similar changes are taking place in the industrial and commercial world. Motors, controllers, actuators, and drives are shrinking. Today’s industrial actuators and motion systems offer either the same speed and power with less size and weight, or are simply more compact and efficient than ever before possible.

The advent of all this product miniaturization is driving a need for equally miniaturized manufacturing and assembly processes. And that means rising demand for miniaturized industrial sensors such as inductive proximity sensors, photoelectric presence sensors, and capacitive proximity sensors.

Another thing about assembling small things: the manufacturing tolerances also get small. The demand for sensor precision increases in direct proportion to manufacturing size reduction. Fortunately, miniature sensors are also inherently precision sensors. As sensors shrink in size, their sensing behavior typically becomes more precise. In absolute terms, things like repeatability, temperature drift, and hysteresis all improve markedly as sensor size diminishes. Miniature sensors can deliver the precise, repeatable, and consistent sensing performance demanded by the field of micro-manufacturing.

For your next compact assembly project, be sure to think about the challenges of your precision sensing applications, and how you plan to deploy miniature sensors to achieve consistent and reliable operation from your process.

For more information on precision sensing visit balluff.us/minis.

Back to the Basics: How Do I Wire a DC 2-wire Sensor?

In one of my previous post we covered “How do I wire my 3-wire sensors“. This topic has had a lot of interest so I thought to myself, this would be a great opportunity to add to that subject and talk about DC 2-wire sensors. Typically in factory automation applications 2 or 3 wire sensors are implemented within the process, and as you know from my prior post a 3 wire sensor has the following 3 wires; a power wire, a ground wire and a switch wire.

A 2-wire sensor of course only has 2 wires including a power wire and ground wire with connection options of Polarized and Non-Polarized. A Polarized option requires the power wire to be connected to the positive (+) side and the ground wire to be connected to the negative side (-) of the power supply. The Non-Polarized versions can be wired just as a Polarized sensor however they also have the ability to be wired with the ground wire (-) to the positive side and the power wire (+) to the negative side of the power supply making this a more versatile option as the sensor can be wired with the wires in a non – specific location within the power supply and controls.

In the wiring diagrams below you will notice the different call outs for the Polarized vs. Non-Polarized offerings.

PolarizedDiagramsnon-polarized diagramsNote: (-) Indication of Non-Polarized wiring.

While 3-wire sensors are a more common option as they offer very low leakage current, 2 wire offerings do have their advantages per application. They can be wired in a sinking (NPN) or sourcing (PNP) configuration depending on the selected load location. Also keep in mind they only have 2 wires simplifying connection processes.

For more information on DC 2- Wire sensors click here.

When is a Weld Field Immune Sensor Needed?

When the topic of welding comes up we know that our application is going to be more challenging for sensor selection. Today’s weld cells typically found in tier 1 and tier 2 automotive plants are known to have hostile environments that the standard sensor cannot withstand and can fail regularly. There are many sensor offerings that are designed for welding including special features like Weld Field Immune Circuitry, High Temperature Weld Spatter Coatings and SteelFace Housings.

For this SENSORTECH topic I would like to review Weld Field Immune (WFI) sensors. Many welding application areas can generate strong magnetic fields. When this magnetic field is present a typical standard sensor cannot tolerate the magnetic field and is subject to intermittent behavior that can cause unnecessary downtime by providing a false signal when there is no target present. WFI sensors have special filtering properties with robust circuitry that will enable them to withstand the influence of strong magnetic fields.

WFIWFI sensors are typically needed at the weld gun side of the welding procedure when MIG welding is performed. This location is subject to Arc Blow that can cause a strong magnetic field at the weld wire tip location. This is the hottest location in the weld cell and typically there is an Inductive Sensor located at the end of this weld tooling.

So as you can see if a WFI sensor is not selected where there is a magnetic field present it can cause multiple cycle time problems and unnecessary downtime. For more information on WFI sensors click here.

There’s more than just one miniature sensor technology

As I discussed in my last blog post, there is a need for miniature, precision sensors. However, finding the right solution for a particular application can be a difficult process. Since every sensor technology has its own strengths and weaknesses, it is vital to have a variety of different sensor options to choose from.

The good news is that there are several different technologies to consider in the miniature, precision sensor world. Here we will briefly look at three technologies: photoelectric, capacitive, and inductive. Together these three technologies have the ability to cover a wide range of applications.

Photoelectric Sensors

MiniPhotoelectricPhotoelectric sensors use a light emitter and receiver to detect the presence or absence of an object. This type of sensor comes in different styles for flexibility in sensing. A through-beam photoelectric is ideal for long range detection and small part detection. Whereas a diffuse photoelectric is ideal for applications where space is limited or in applications where sensing is only possible from one side.

Miniature photoelectric sensors come with either the electronics fully integrated into the sensor or as a sensor with separate electronics in a remote amplifier.

Capacitive Sensors

MiniCapacitiveCapacitive sensors use the electrical property of capacitance and work by measuring changes in this electrical property as an object enters its sensing field. Capacitive sensors detect the presence or absence of virtually any object with any material, from metals to powders to liquids. It also has the ability to sense through a plastic or glass container wall to detect proper fill level of the material inside the container.

Miniature capacitive sensors come with either the electronics fully integrated into the sensor or as a sensor with separate electronics in a remote amplifier.

Inductive Sensors

MiniInductiveInductive sensors use a coil and oscillator to create a magnetic field to detect the presence or absence of any metal object. The presence of a metal object in the sensing field dampens the oscillation amplitude. This type of sensor is, of course, ideal for detecting metal objects.

Miniature inductive sensors come with the electronics fully integrated into the sensor.

One sensor technology isn’t enough since there isn’t a single technology that will work across all applications. It’s good to have options when looking for an application solution.

To learn more about these technologies, visit www.balluff.us

Do’s and Don’ts For Applying Inductive Prox Sensors

Inductive proximity sensor face damage
Example of proximity sensor face damage

In my last post (We Don’t Make Axes Out of Bronze Anymore) we discussed the evolution of technologies which brought up the question, can a prox always replace a limit switch?  Not always.  Note that most proxes cannot directly switch large values of current, for example enough to start a motor, operate a large relay, or power up a high-wattage incandescent light.   Being electronic devices, most standard proxes cannot handle very high temperatures, although specialized hi-temp versions are available.

A prox is designed to be a non-contact device.  That is, it should be installed so that the target does not slam into or rub across the sensing face.  If the application is very rough and the spacing difficult to control, a prox with more sensing range should be selected.  Alternately, the prox could be “bunkered” or flush-mounted inside a heavy, protective bracket.  The target can pound on the bunker continuously, but the sensor remains safely out of harm’s way.

If direct contact with a sensor absolutely cannot be avoided, ruggedized metal-faced sensors are available that are specifically designed to handle impacts on the active surface.

Be sure to consider ambient conditions of the operating environment.  High temperature was mentioned earlier, but other harsh conditions such as disruptive electrical welding fields or high-pressure wash-down can be overcome by selecting proxes specially designed to survive and thrive in these environments.

Operationally, another thing to consider is the target material.  Common mild carbon steel is the ideal target for an inductive prox and will yield the longest sensing ranges with standard proxes.  Other metals such as aluminum, brass, copper, and stainless steel have different material properties that reduce the sensing range of a standard prox.  In these cases be sure to select a Factor 1 type proximity sensor, which can sense all metals at the same range.

We Don’t Make Axes Out of Bronze Anymore

Every technology commonly in use today exists for a reason.   Technologies have life cycles: they are invented out of necessity and are often widely used as the best available solution to a given technical problem.  For example, at one time bronze was the best available metallurgy for making long-lasting tools and weapons, and it quickly replaced copper as the material of choice.  But later on, bronze was itself replaced by iron, steel, and ultimately stainless steel.

When it comes to detecting the presence of an object, such as a moving component on a piece of machinery, the dominant technology used to be electro-mechanical limit switches.  Mechanical & electrical wear and tear under heavy industrial use led to unsatisfactory long-term reliability.  What was needed was a way to switch electrical control signal current without mechanical contact with the target – and without arcing & burning across electrical contacts.

Example of an inductive proximity sensor

Enter the invention of the all-electronic inductive proximity sensor.  With no moving parts and solid-state transistorized switching capability, the inductive proximity sensor solved the two major drawbacks of industrial limit switches (mechanical & electrical wear) in a single, rugged device.  The inductive proximity sensor – or “prox” for short – detects the presence of metallic targets by interpreting changes in the high-frequency electro-magnetic field emanating from its face or “active surface”.  The metal of the target disrupts the field; the sensor responds by electronically switching its output ON (target present) or OFF (target not present). The level of switched current is typically in the 200mA DC range, which is enough to trigger a PLC input or operate a small relay.

In my next post, I will explain the do’s and don’ts for applying inductive prox sensors.

Meeting the Challenges of Precision Sensing: Very Small Target Displacement

Fundamental application problem: Inductive prox sensor is latching on (or…failing to turn on)

  • The prox sensor gap is set to turn on when the target approaches, but it does not turn off when the target recedes (latching on)
  • The prox gap is opened up until sensor turns off at maximum target approach, but it fails to detect the target upon the next approach cycle
  • The prox sensor gap is set to turn on when the target approaches, but later on the operation becomes intermittent (prox fails to reliably detect the target)

Solution: High-performance miniature inductive prox sensor

Critical sensing performance specifications:

o   Low variation of switch point from sample to sample
o   Tight repeat accuracy of switch point
o   Low temperature drift of switch point
o   Low maximum hysteresis (distance between switch-on to switch-off)

Continue reading “Meeting the Challenges of Precision Sensing: Very Small Target Displacement”

Basic Operating Principle of an Inductive Proximity Sensor

Did you ever wonder how an Inductive Proximity Sensor is able to detect the presence of a metallic target?  While the underlying electrical engineering is sophisticated, the basic principle of operation is not too hard to understand.

At the heart of an Inductive Proximity Sensor (“prox” “sensor” or “prox sensor” for short) is an electronic oscillator consisting of an inductive coil made of numerous turns of very fine copper wire, a capacitor for storing electrical charge, and an energy source to provide electrical excitation. The size of the inductive coil and the capacitor are matched to produce a self-sustaining sine wave oscillation at a fixed frequency.  The coil and the capacitor act like two electrical springs with a weight hung between them, constantly pushing electrons back and forth between each other.  Electrical energy is fed into the circuit to initiate and sustain the oscillation.  Without sustaining energy, the oscillation would collapse due to the small power losses from the electrical resistance of the thin copper wire in the coil and other parasitic losses.

 Inductive proximity sensor cutaway with annotation Continue reading “Basic Operating Principle of an Inductive Proximity Sensor”

4mm Is The New 2mm

When I began working in the industrial sensor industry back in the mid-’90s, the standard sensing range for a size M12 flush-mount inductive proximity sensor was 2.0 mm.  Advances in sensor technology later brought about so-called “Extended Range” proxes, with M12 flush-mount proxes rated at 4.0 mm nominal sensing distance.  Another popular term for these extended range proxes is “2X”, as in “Two Times” the standard sensing range.

Today, competition and time has brought down the prices of most 2X sensors close to or equal to the prices for standard “1X” sensors.  As a result, there’s a large and growing industry trend to just go ahead and standardize on 2X sensors.  And why not?  If the cost is essentially the same, dollar for dollar a sensor with more range is a more versatile sensor.  The availability of longer range in smaller housings is driving migration from M18 bodies to M12 bodies, and from M12 housings to M08 housings.  This saves money and helps reduce the size and weight of modern machinery.

Continue reading “4mm Is The New 2mm”